
What is Design Thinking?
Design Thinking puts one person group in focus – the user. All activities in Design Thinking circulate around making the user’s life better. Design Thinking is an activity where all stakeholder take part. Not only designers, product owners or developer are part of the group, marketing, community management, finance and even legal should be involved in this very early stage of the product development cycle. Why should they? It’s a matter of understanding and communication. All participants of the Design Thinking process are part of goal setting, reasoning and the detailed planning. They need to share the vision behind the product. Time is wisely spend in the beginning to smooth the following implementation steps. Involvement of participants? 100%. No e-mails, no meetings, just the user and their pain points.
Other names for Design Thinking are “Design Sprint” (Google) or “Iteration 0” (infoq) or “Design DOING”. Design Thinking is a great planning tool to let all people understand what is build when and with what purpose. The process consists of a set of methods typically executed directly before the typical lean and agile development cycles start. It defines what to build and to communicate this purpose amongst the participants in an efficient, effective and fun way.
What’s the result of Design Thinking?
The result of the Design Thinking activity is a verified prototype, common understanding of what to achieve and a plan on how to proceed building the Minimal Viable Product and which features to add after going live. On top of that comes the certainty to build a set of functions that user’s really want and need – not a feature an executive has fallen in love with. Further definition of Design Thinking: IDEO, interaction design foundation or wikipedia.
What’s the purpose of Design Thinking?
- Customer centricity uncover real user needs
- Boost communication and understanding bring business and technology together – let the whole team understand what to build and for what
- Create business value create and test solutions for these user needs
- Be better and faster build better products and bring them to market sooner
- Be focused and measurable extract clear goals from real customer needs
- Get prioritization right feature prioritization gets a lot easier (no “pet” features)
Phases of Design Thinking
Design Thinking is a fun exercise, fast paced with the goal to create a concrete problem definition and an implementation plan for the most promising solution.
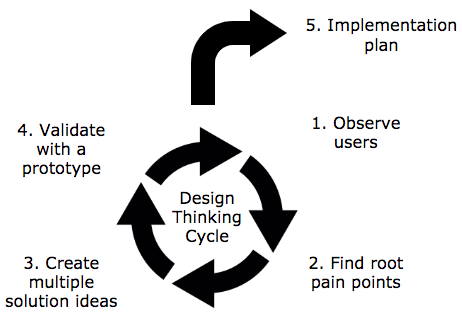
Starting with an idea of a user problem in mind the user observation phase results in a better understanding of the real user pain points. The team identifies the root pain points of the users and document them in an experience map. Creation of multiple solution ideas means to apply ideation techniques with the clear goal in mind of not implementing the first-thought-about solution. The paper prototype challenges the solution idea from ideation with the lowest possible effort and tries to resolve the user’s pain points. The implementation planning starts right after the finalization of the paper prototype. The result of the Design Thinking process is an implementation plan.
Implementation Guideline – Design Thinking in 10 Steps
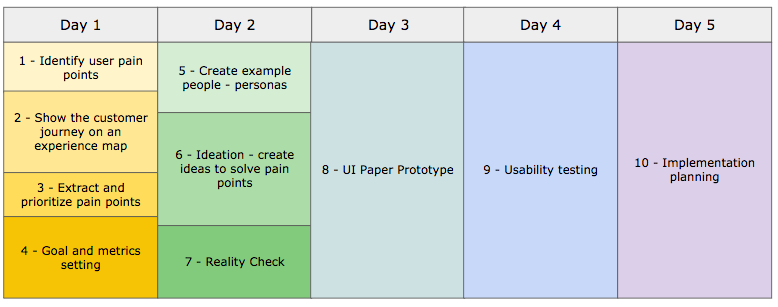
1 – Identify user pain points
Go out of the building, watch, observe and interview real users experiencing the problems to solve by the solution you’re about to build. Watch at least 8 individuals! User’s verbal feedback usually contains their thinking of solutions, not their problems. The understanding of the team prior to the user observation is significantly different from it after watching and talking to users.
2 – Show the customer journey on an experience map
The experience map shows the current product experience (if any) and the user pain points. Organize notes from the team’s observation phase on sticky notes on a wall. All members of the Design Thinking team take part in the observation phase and make their own notes. The experience map shows the flow from the beginning (left) to the end (right) of the user journey.
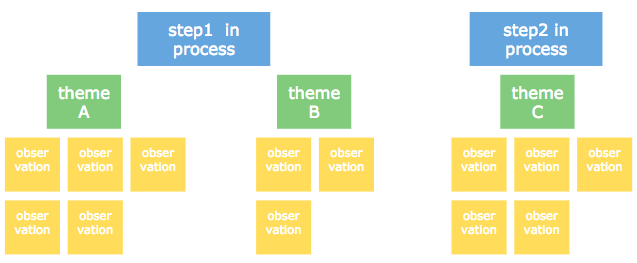
From top to bottom the experience map shows the separate steps (above in blue) in the user journey. Below the user journey steps yellow notes represent the observations from the team members. Themes / cluster – represented in green – create an umbrella for the various observations. Additionally, emotional states – e.g. with smileys – enrich the overall journey and make it more visual.
3 – Extract and prioritize pain points
At this stage the experience map contains contains a lot of observations from various people. The next step in the process is to extract the pain points to focus on during the remainder of the process. “Dot-voting” is the tool of choice here. Each participants gets 4 to 5 dots. The biggest pain points receive the dots. Dot-voting happens all at once – at the same time. Observations may receive none, one or many dots from each participant. Counting the dots identifies the most important pain points.
4 – Goal and metrics setting
Having the ordered list of pain points extracted, the next step is to convert them into goals and make the progress measurable. Setting the goals can result in either quantitative or qualitative metrics. If possible assign real numbers to the goals. Orientation criteria for setting the goals can be:
- efficiency (e.g. time spent on task)
- effectiveness (e.g. reduction of # of errors)
- satisfaction (customers’ happiness with the solution)
5 – Create example people – personas
Instead of developing a product for anybody – and hence most likely nobody – define real people, personas. Be specific and narrow user segments down. The persona should include the name, attributes, goals, concerns, quotes and other emotional elements. Ideally extract only 2 to 3 personas either individually or in small groups. Share the results afterwards with the rest of the group.
6 – Ideation – create ideas to solve pain points
Now it’s time to think about multiple solutions to address the user’s paint points. Don’t jump to solutions – don’t build the first “obvious” solution. Most likely there are more clever approaches available. All participants take part in the solution creation phase. Individuals create ideas time-boxed (e.g. 15 minutes). Afterwards they share them with the broader audience. There are no stupid ideas – it’s important to listen carefully to all ideas – some of them will stipulate further thinking. After the individual session a group session to detail the most promising ideas follows. Involving all team members creates shared ownership for the solution.
7 – Reality check
During ideation the goal is to create a lot of ideas. Are they all feasible? Can they really solve the issue? How does this look in reality? Since the ideas are in early stages we need to check them with reality. Place the ideas on storyboards. The storyboards show the interactions of the users with the idea. They are a sequence of scribbles which fit easily on a sheet of paper and focus on the positive user path. Let all edge cases, negative paths, recovery steps aside. Just focus on the positive user experience path associated with the idea. Reality check happens as an individual task or in smaller groups.
8 – UI Paper Prototype
The reality check sketches the user flow on a very high level – only focusing on the positive path and keeping intermediate screens aside. With the Paper Prototype the user flow should be as realistic as possible. Now the team members need to think through intermediate screens and pop-ups, edge interactions with the user and error cases as well. They transform the high-level storyboard an user interface. Sticky notes represent the UI elements – so the elements can change easily.
9 – Usability testing
Now it’s time to get real feedback from real users on the ideas developed. Any feedback is welcome and influences the prototype iterations. Feedback is usually more open since the prototype signals “Hey, we’re still in early phases. Don’t hesitate to give honest feedback!”. For the overall product changes at this stage are ways cheaper than rework done in later phases. Identify around 5 test participants – ideally based on the persona descriptions used so far in the design process. The storyboard serves as the base for tasks for the participants. The UI needs to change as an answer to the actions of the participants. Do so by exchanging notes or other elements of the UI manually. During the Paper Prototype testing give the participants no hints. The overarching goal is to identify gaps or errors in the user flow and collect feedback to improve the prototype.
10 – Implementation planning
The last step to finish the Design Thinking process is to come up with an agreed-upon implementation and launch plan. The plan is incremental in nature, delivers business value as early as possible and involves all disciplines. Implementation planning usually results in a story map which reflects the desired state of future interactions. Jeff Patton explains story maps in great detail in his book “User Story Mapping”. Here are only some important aspects.
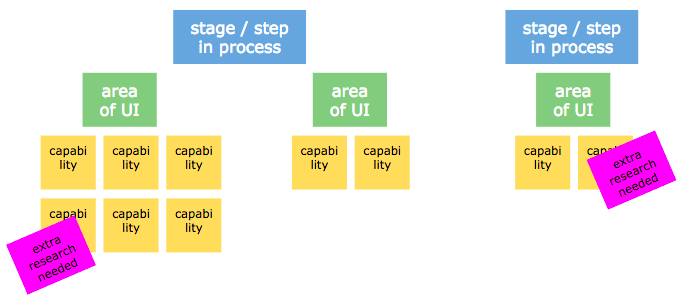
What’s the story map?
The story map is a one page explanation of the big picture and shows details of the planned product or feature. It includes a release strategy, describes iterations around the minimum viable solution and identifies areas for additional research. First of all list all stages of the user journey as they use the product. This is usually similar or equal to the blue sticky notes produced in the experience map. Below, in green, put the concepts of the UI which help to fulfill the step in the user journey. Yellow notes hold capabilities of the product extracted from the paper prototype. Take a note on the sticky notes of the expected outcome the capability delivers to the user. The yellow notes usually translate into implementation epics in agile development. Put pink notes on capabilities marking additional research need.
With the finished story map, you have a quite comprehensive view of what needs to be build for a perfect solution. To further mitigate risk of failure you want to start with the least minimum effort in development – identify the minimum viable product feature set. Now, it’s time to sort the yellow sticky notes below the UI areas according to their criticality to the product success. Sort them into these categories having the question in mind: “How necessary for users is this capability to fulfill their task?”:
- critical: absolutely necessary for user to get tasks completed
- commercially acceptable: adding these features will allow commercial success
- later: add capability later
- nice-to-have: capability which can be added in later phases if time allows

When finished with the prioritization, you have your iteration planning finished. The top lane includes all capabilities needed for the minimal viable product. Next lane adds functions to enable commercial success. Later lanes store further functions to add to the product to become a full solution.
Find some videos on lynda.com by Chris Nodder on the specifics of each step and the applied technique (need a Lynda.com subscription).
Design Thinking – Timeline
Typically Design Thinking activities fit into a 5 days week. You might want to organize them like this:
Pingback: Product Discovery Techniques - notes on "How to Create Tech Products Customers Love"